
A painter or sculptor can work from memory or imagination,
but something must happen in the real world to make a real photograph.
You are invited to send any comments or photography questions to me.
I will endeavor to respond to all such communications.
Use the "Contact" link above, or email me at:
May 2023
In the Garden
When photographing flowers, a little preparation and recognition of the properties of light will take you a long way toward success.
EQUIPMENT
While any camera will do, you will get the best results by using a lens that can focus quite closely. A macro lens isn't really necessary, but if you have one, use it. Otherwise, any lens that can focus as close as, say, two feet should serve you well.
OTHER GEAR
Unless it has been raining, it's a good idea to take along a small, pocket-sized spray bottle filled with water. (Water droplets on flowers or leaves add a nice texture and provide added reflections and highlights.) It's also worthwhile to have a black card sized about 8" x 10" to use as a background when you need it, or to isolate your chosen flower from surrounding and intrusive foliage. Finally, it's always handy to have a small flashlight in your kit.
MY FLOWER RULES
I urge you to at least consider following my flower rules . . .

Illuminate the subject so the light seems to come from inside the flower.
This is where your small flashlight can come in handy if the natural light does not accommodate you. Simply place the flashlight out of the frame, aim it up from below the flower, compose your shot, and shoot.

With rare exceptions, you will create a more dynamic flower image if you think of it as a portrait.
Which is to say, try to avoid shooting down at a flower, as if you were a bee about to feed on it. Instead, think of the petal as a face, and the stem as a neck.
And shooting or processing flower shots in black and white? Well, it makes for an interesting challenge.
Something Every Street Photographer Can Use
If you are a street photographer (or want to be), but you feel self-conscious or nervous about taking pictures of strangers, here's
something that can ease the anxiety.

Put on a yellow safety vest, and you automatically become someone out doing a job on the infrastructure or surveying a site with your camera. You will be taken as
someone not worth noticing.
Yes, it's odd that something designed to get attention does just the opposite. But it works, I can tell you. And the more gear you are lugging about (tripod, two cameras, a long lens) the better it works at making you virtually invisible.
One thing you'll want to do before donning this: drop it on the ground and walk on it a few times to make it look a bit dirty and worn.
Shooting Film That Expired 20+ Years Ago

A friend, who shoots only color images, recently gave me several rolls of black and white film, 120 size, ISO 400 Kodak Tri-X and Ilford HP5 emulsions. The film all expired in 2000, but he had kept it in his freezer these many years.
I was quite confident it would perform just like new. And so it did. The first roll I used was one of the four HP5 rolls at hand. I put it in the Mamiya 7 and used the 80mm and 50mm lenses. Ten exposures. And here are four of them.


I have seen photos made on black and white film that is 50 . . . 60 . . . 70 years old, and they exhibit world class detail, contrast, and dynamic range.
Color film? Well, that's another story for another day.
April 2023
The 400 Megapixel Canon R5? Not So Fast
As if it were some kind of miracle, Canon has announced that a new firmware update gives its R5 camera the capability to shoot 400mp images. This marvel is made possible by something called "pixel shift multi-shot." Canon's implementation of this technology involves stitching together multiple shots captured by moving the in-body image stabilization (IBIS) mechanism (and thus, the sensor), resulting in what Canon says is an image "somewhere in the area of 400 megapixels."
Canon also says this is "unprecedented." Well, not so fast there, sparky. It just so happens that Leica employed pixel shift technology to generate images of 187 megapixels in the SL2 three years ago. Since then, both Sony and Olympus have incorporated the function into their cameras that have IBIS.
True, none of those other manufacturers claim 400 megapixel images. But on the other hand, Leica and the others apply the technology to RAW files. Canon cannot. With the R5, it's JPGs only. Each JPG image file is "somewhere in the area of" 150mb.
And it gets even worse. To utilize the R5 in this way, you must use Canon's photo editing software (the stuff you got free with the camera). No Lightroom. No Photoshop. Nothing but Canon's EOS Utility or Digital Photo Professional. If you have ever held a large human turd in your bare hand, you know what it's like to use Canon's software.
Boo.
March 2023
One Sentence Photo Editor Reviews
ADOBE PHOTOSHOP: The one time gold standard is now getting long in the tooth as it remains as much of a power and memory hog as
ever, yet becomes more sluggish and temperamental.
ADOBE LIGHTROOM (SUBSCRIPTION MODEL): A terrible mess made even worse than the classic version.
ADOBE LIGHTROOM CLASSIC: Ugh.
GIMP: Free, open source substitute for Photoshop, and just as good 80% of the time.
AFFINITY PHOTO: Great alternative to Photoshop, but the re-learning curve can be daunting for Photoshop users.
ON1 PHOTO RAW: Handles RAW images much, much better than anything from Adobe, and does everything else
any photographer needs.
CAPTURE ONE: Makes Lightroom look like the vomit that it is, but be ready to burn some midnight oil in learning.
EXPOSURE X7: As an all-in-one cataloging and general editing tool, this one is hard to equal and harder to beat.
DxO PHOTOLAB: Forget it. Complicated, expensive, and just not worth the effort.
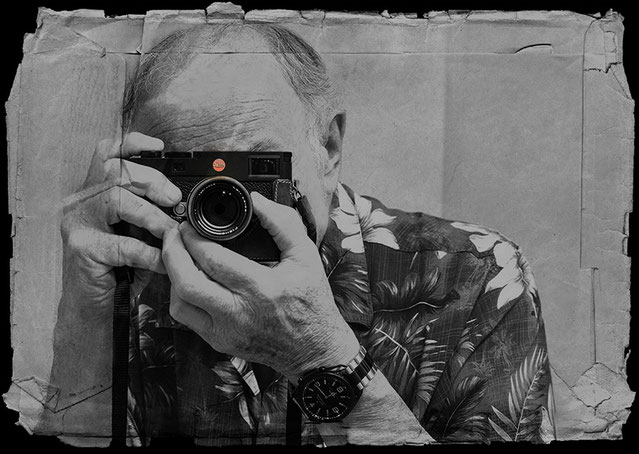
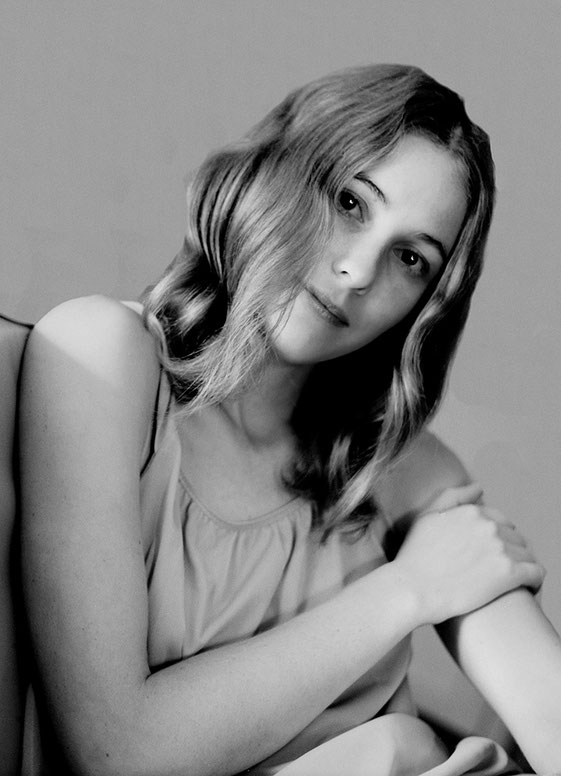
The "Leica Look"

I did not take this photograph. It is © Sohail Karmani. It was taken with a Leica M10-R and a Summilux f/1.4 lens wide open. And it is, to me anyway, a classic example of the "Leica Look."
There has been much discussion (and disagreement) over the years about the Leica Look. What is it? Is it a real thing? Can't other cameras and lenses emulate it?
This is just my opinion, but I think the Leica Look is an actual thing. It can be emulated by other cameras and lenses, but only with a considerable amount of work in Photoshop or some other editor.* And I think I know what it is composed of.
Here's my position. There are three fundamental elements to the Leica Look. The first lies in how Leica lenses render color. Today, this is called Leica's "unique color science." This is a mighty fancy phrase to describe the reproduction of natural, neutral color, free of tonal aberrations. But since more than 80% of famous Leica photographs were taken with black and white film, there has to be more to the "Look" than this.

Indeed there is. The second element of the Leica Look comes from using the lens wide open, or very close to it. From the precise plane of focus, there is gradual falloff to blur. It is the measured, piecemeal blur to pure bokeh that characterizes the Leica Look, and it bestows on the image a three-dimensional illusion. In the digital world, this effect is as much the product of the sensor as of the lenses, and rumor has it that Leica sensors are fitted with proprietary thin filter stacks and curved microlens arrays. This design is said to be two things: (1.) Expensive; (2.) A force that prevents abrupt changes from sharpness to softness while also increasing the signal-to-noise ratio.
The third element of the Leica Look is, of course, the rendering of light. This is a hard one to describe, as it is a strictly visual construct. But perhaps we can think of it this way . . . Any given temperature of light, and any given luminance, is rendered in a Leica image frame with absolute consistency. This performance is most noticeable in film photography, where the dynamic range far exceeds even the most ambitious digital sensor.
And that's my take on it. Naturally, the whole concept is as controversial as ever.
As one person wrote: "All of your subjects will be cringing in your photos because they can see how you wasted money on a Leica camera. This look of disdain that you capture on your subject's face is commonly referred to as the Leica Look."
* See how one photographer used Lightroom to try to emulate the Leica Look
with a Sony camera and lens: https://www.youtube.com/watch?v=A_72LpD7QS8
Exposure Compensation Tips
Virtually every digital camera allows you to make exposure compensation adjustments. (Many film cameras offer
the same function.) Typically, the adjustments will range from three stops overexposure to three stops underexposure in one-half-stop increments.
For example, if the meter tells you that the correct exposure is 1/125 second at f/5.6, you can set the exposure compensation as follows:
OVEREXPOSURE . . .
+1 (1/125 @ f/4 or 1/60 @ f/5.6)
+2 (1/125 @ f/2.8 or 1/30 @ f/5.6)
+3 (1/125 @ f/2 or 1/15 @f/5.6)
UNDEREXPOSURE . . .
-1 (1/125 @ f/8 or 1/250 @ f/5.6)
-2 (1/125 @ f/11 or 1/500 @f/5.6)
-3 (1/125 @ f/16 (or 1/1000 @f/5.6)
. . . or any increment in between these values.
Note that either the aperture or shutter speed will change, but
not both, depending on what mode you are shooting in: aperture
priority or shutter priority. If you are shooting in some program or
auto mode, the camera's exposure compensation adjustment
will be based on what the camera "thinks" is best.
First, I will tell you what I do, then I will tell you what most other photographers do.
DIGITAL CAMERAS
It is my practice to almost always underexpose by one stop. (If you shoot with a mirrorless camera, you can see the effect of exposure compensation
in the viewfinder.) I do this because even in soft light, digital sensors have a tendency to blow out the highlights, and once detail in the highlights is gone, it cannot be
recovered.
I do make two exceptions to this practice. (1.) If the predominant subject in the shot is snow, I overexpose by one to 1 1/2 stops. Otherwise, the snow will be rendered as gray in the image. (2.) If I am shooting a sunrise or sunset, I underexpose by two stops.
Most photographers do not follow my practice. In fact, most never bother with exposure compensation at all. Those that do bother tend to follow this approach: In soft light, no compensation; make any needed adjustments in post- processing. In hard light, underexpose by one stop to preserve detail in the highlights.
FILM CAMERAS
I think all film enthusiasts follow pretty much the same procedure that I use. It is this: In the "blue hour" (one to two hours after sunrise), no
compensation. From mid-morning to mid-afternoon (the hardest light of the day), over-expose by one stop to reduce blocking up in the shadows and preserve detail there. In the "golden hour" (one
to two hours before sunset), no compensation.
If you use exposure compensation with film, whether for one frame or an entire roll, the film should be developed normally. So if you don't develop your own film, be sure not to mention exposure compensation to your lab.
February 2023
How Many Megapixels Do You Need?
Even though the megapixel wars seem to be abating, many of today's digital cameras are equipped with sensors of 30, 40 or more megapixels. Fuji's
medium format cameras top out at 100 megapixels, and the Leica M11 sports a full-frame sensor of 60 megapixels.
Are these enormous pixel numbers necessary? Are they even useful? For 90% of photographers 90% of the time, the answer to both questions is
"no."

Some folks say that you can make bigger prints if you have more megapixels to work with. And this is true. For example, at 300ppi, you can make a print about 10" x 16" from a 16mp image, while a 24mp image will allow you to make a print up to about 13" x 20".
But do you need 300ppi? The answer, again, is "no." The larger the print, the greater the viewing distance, and the greater the viewing distance, the less resolution required to maintain detail and sharpness. (The human eye has its own resolving power, after all.)
So you can reduce the resolution of the print. Drop to 200ppi, and that 24mp image can be blown up to about 20" x 30". Nobody looks at a 20" x 30" print from a few inches away. You have to be several feet away just to take it all in.
Think of it this way: In most urban and suburban areas, you see truly gigantic images every day; they are called billboards. And they are sharp and filled with fine detail. Want to know the industry-standard resolution of those prints? 10ppi. The reason they look so colorful and detailed is that you are looking at them from hundreds of feet away. Get up really close, and they will turn to visual mush.
The one real advantage you get with larger megapixel images is in cropping. You can crop a 40mp, 50mp, or 100mp image like crazy and still have enough megapixels left to make a very large print, especially at 200ppi or 150ppi.
Finally, to answer the original question, 12mp is more than enough if you only look at your photos on computers, tablets, or phones. If you make the occasional large print (up to about 16" x 24"), a 16mp sensor is more than you need. And for 90% of photographers 90% of the time, 24mp is overkill.
The High Resolution Sensor Myth

For some time now, the "truth" has been set forth that high resolution sensors (say 40+ megapixels) cannot perform as well in low light as lower
resolution sensors (say 20-30 megapixels). The "theory" is that pixels are smaller in high resolution sensors (true enough) and thus cannot provide adequate dynamic range in low light situations.
Plus, it is said as a matter of gospel that they introduce more digital noise and optical aberrations in low light and high ISO settings (say 1600 or higher) than the larger pixels of low
resolution sensors.
The fact is, the only difference you can even see in the low light results from sensors of lower or higher resolution is apparent only when you pixel-peep, that is, blow the image up to 100%.
In the real world, where you will likely be looking a prints no larger than 24" x36" (if you make prints at all), you will not be able to detect any
difference in image "purity" regardless of high or lower resolution sensor, low light, or high ISO. And if you are simply looking a images on a computer, tablet, or (ugh) phone, there is no
possible way to discern any difference of any kind.
Of course, extremely high ISO settings will result in reduced dynamic range, increased digital noise, and certain other aberrations, but these have nothing whatsoever to do with sensor resolution per se.
January 2023
One More (Last) Time: The Exposure Triangle
It's amazing, really. Many budding photographers have significant trouble understanding the Exposure Triangle. Some who started with digital cameras never learned about it, and perhaps half of those who did become acquainted with it still have no real idea of what it means or how it works.
The Exposure Triangle was among the very first things I taught in my classes for beginning photographers. I did this because it is so essential to everything else in photography. But even as I talked to the class, I noticed many faces staring back at me like this:

So, what is the Exposure Triangle? It is simply an analogy that describes how ISO, aperture, and shutter speed work together to expose an image correctly. And it's a balancing act. To maintain the triangle, you must balance ISO, aperture, and shutter speed. If one of these components is set too high or too low for the situation you're photographing, you'll need to make adjustments in at least one of the other two.

One helpful way to learn what this means is to look at a hand-held, analog light meter. First, let's assume that you have taken a meter reading with your camera, that the ISO is set to 100, and the aperture to f/8. Your camera tells you that the correct shutter speed is 1/125. Here's what this looks like on an analog meter:

Note that the analog meter gives you, at a glance, the corresponding shutter speeds for all apertures from f/1.4 to f/32: 1/250 @ f/5.6, 1/500 @f/4, 1/1000 @f/2.8, etc. So let's now assume that the subject you are about to shoot is in motion, and you'd like to use a faster shutter speed. Say, 1/500. You can do that, of course, but when you increase the shutter speed (reducing the amount of light reaching the sensor), you must open the aperture by a corresponding amount (two stops) so that the proper amount of light will still be delivered to the sensor. Your exposure will now be 1/500 @ f/4. It will give you exactly the same exposure as 1/125 @ f/8. The only difference will be depth of field. The wider aperture (f/4) will provide less depth of field than f/8.
If you wanted to maintain some depth of field, but shoot at 1/500 to stop motion, your only option would be to increase the ISO.

Like this . . . The camera is set to ISO 200, and the aperture is set to f/8. The camera tells you the shutter speed is 1/250. So you can shoot at 1/500 @ f/5.6, 1/1000 @f/4, or 1/2000 @ f/2.8.
The idea, as you might have guessed, is to practice enough to implant these relative settings in your head, so that you can make such decisions instantly and intuitively.
On the other hand, if you’re new to photography, it would be much easier to flip the camera to Auto or Program and hope for the best. But the best will seldom be the result, because you will be turning control over to the tiny computer inside your camera.
Rage against the machine.
December 2022
My Best Photograph, 2022
I subscribe to the old photographer's maxim: If you can take 10 good photographs a year, you are doing very well.
Even though health issues have repeatedly taken me out of commission this year, I do think I managed to take 10 good photos, and perhaps even three or four that I am (privately) proud of.
My feeling is that this was the best photograph I took this year.
And yes, the animal was alive, not mounted on a wall.

October 2022

That First Year
I lived in Manhattan then, and I bought my first "serious" camera in 1967. It was a Nikon FTn with a Nikkor 50mm f/1.4 lens. I bought it at Wall Street Camera Exchange, and I think I paid about $300. This was a substantial amount of money in those days, and for me it was about a month's pay.
Shortly after that, I added the magnificent Nikkor 105mm f/2.5 lens.
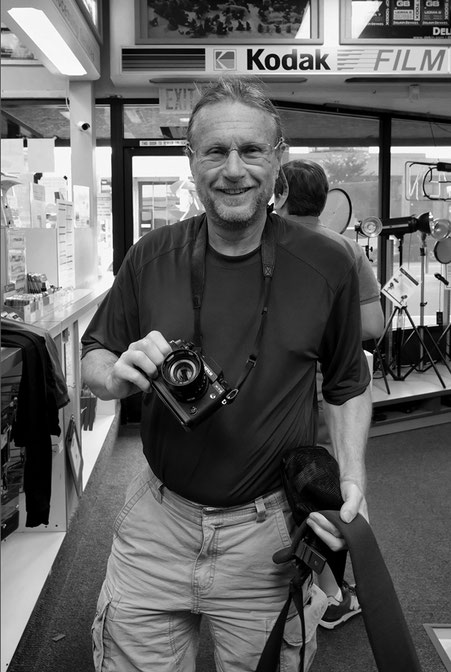
Then I took a very difficult and challenging 10-session night class at City College of New York taught by the famous Life photographer Andreas Feininger. He was a very demanding teacher, and he did not suffer fools very well. When the class sessions ended, I took his picture in a bookstore where he had taken us to build our photographic libraries. And yes, he did recommend two of his own books.
In that first year I think I probably ran 100 rolls of film through the Nikon. Most of the photographs have not survived, of course. But about two dozen have.
Here's a sampling. (I'll let them stand for themselves without comment.)


Mission Viejo Sunsets
About two years ago, I moved to a hillside house in Mission Viejo, California. In no time at all, I noticed that Mother Nature often put on quite a show right off my patio. If there are clouds in the sky, I try to make it a point to be at home come sunset. Of course, even with clouds, there is no guarantee. But every now and then something special happens. Here are a few examples from the last 20 months.

August 2022
The Rules, Revisited
As the decades have rolled by, I've developed some rules for good photography, and I've shared them with the beginning students that I have taught in various venues over the last 10 years.
Of course, some people do not like rules. Others say, "there are no rules." Still others say that I am arrogant or presumptuous in even suggesting that my rules will make anybody a better photographer. And that's fine. To each his own. But there are many other people who have told me that some of my rules helped open their eyes or open new doors to composition, exposure, and understanding light.
Not all rules apply to every photograph, and if you have a particular artistic vision for a particular subject, well . . . rules are made to be broken.
1. GET CLOSER. If you think you are close enough to your subject, you are not.
2. ONE SUBJECT PER PHOTOGRAPH. Every photograph should have only one unmistakable subject.
3. LEARN THE RULE OF THIRDS AND APPLY IT. If it was good enough for Rembrandt, it is good enough for you.

4. EVERY LANDSCAPE PHOTO SHOULD HAVE AT LEAST THREE LAYERS. Foreground, middle distance, far distance.
5. NOT EVERY PHOTOGRAPH SHOULD BE FROM A PERSPECTIVE SIX FEET OFF THE GROUND. Crouch, squat, lie down.
6. WITH RARE EXCEPTIONS, ALL PORTRAITS OF HUMAN BEINGS SHOULD BE IN BLACK AND WHITE.
7. IN A HEAD AND SHOULDERS PORTRAIT, THE EARS SHOULD BE OUT OF FOCUS. Human ears are ugly.
8. PLACE THE EYES IN THE FRAME ACCORDING TO THE RULE OF THIRDS. Do not worry about cropping off the top of the head. Nothing interesting is happening up there.
9. DIAGONAL LINES OR SHAPES IN A PHOTOGRAPH MAKE IT MORE DYNAMIC.
10. THE EYES MUST BE IN FOCUS IN EVERY HUMAN AND ANIMAL PORTRAIT.
11. PHOTOGRAPHY IS A SUBTRACTIVE ART. The less that is in the frame, the better.
12. ANGLES, ESPECIALLY LITERAL OR IMPLIED TRIANGULAR SHAPES, MAKE PHOTOS MORE COMPELLING.
13. LIGHT IS THE SUBJECT OF EVERY PHOTOGRAPH.
14. WITHOUT AN UNDERSTANDING OF LIGHT, MAKING A WORTHWHILE PHOTOGRAPH IS A MATTER OF LUCK.
15. FOR FLOWER SHOTS, ILLUMINATE THE SUBJECT SO THE LIGHT APPEARS TO COME FROM INSIDE THE PETAL.
16. RUN YOUR EYE AROUND THE EDGES OF THE FRAME BEFORE YOU PRESS THE SHUTTER. About 75% of the time, something will be there that you do not want in your
photograph.
17. THE THREE SECRETS TO GOOD WILDLIFE PHOTOGRAPHY ARE PATIENCE, PATIENCE, AND PATIENCE.
18. 90% OF THE BUTTONS AND DIALS ON MOST DIGITAL CAMERAS HAVE NOT A THING TO DO WITH PHOTOGRAPHY.
19. THE ONLY TOOLS YOU HAVE TO CONTROL EXPOSURE ARE APERTURE, SHUTTER SPEED, AND ISO.
20. IF YOU ARE A BEGINNER OR A NOVICE, BUY THIS BOOK, READ IT, THEN READ IT AGAIN.

June 2022
Moonrise

Moonrise, Hernandez, New Mexico Ansel Adams's "Official" Final Print
In an interview years ago, Ansel Adams compared photography to music: The negative is the score; the print is the performance. This analogy came naturally to him because he was an accomplished classical pianist before he left music behind for his insatiable love of film.
Widely considered to be the finest landscape photograph ever made, Moonrise, Hernandez, New Mexico was his magnum opus. It was certainly his most popular print, and he sold hundreds of 11"x14" and 16"x20" prints made by his own hand until the mid-1960s. He sold the latter size in those days for $250. Today? Well, the mind boggles.
The making of Moonrise (both the score and the performance) is a famous story, at least in photography circles, but in case you are not familiar with it, join me for a short education in what photographic art is about.
THE SCORE
It was October, 1941. Adams had spent the day in the company of his son, Michael, and a young family friend. After driving from Santa Fe to the Chama River Valley, he sought to find an area with both interesting landscape and compelling sky. But it was one of those days so familiar to landscape photographers: a bright, empty, blue expanse of sky and hard shadows dotting the land in all the wrong places.
Adams decided to write off the day as a total loss, and the trio headed back to Santa Fe. They had not traveled far when Adams glanced over his left shoulder and saw what he later called "an ordinary miracle" and an "inevitable photograph." The nearly full moon was rising above the tiny town of Hernandez, and the simple white crosses in a small cemetery reflected the last rays of the setting sun.
He steered the car into a ditch, all the while yelling at his companions to help him set up his 8x10 view camera. He knew he had only seconds to act before the sun's light vanished below the mountains behind him. The tripod was quickly planted, the camera secured atop it. Adams selected the 23-inch component of a Cooke triple-convertible lens for a mild two-power telephoto effect, and he grabbed a film holder loaded with Agfa Isopan film, ASA (ISO) 64.
Only one thing was missing. Adams could not find his light meter. But as Louis Pasteur said, "Chance favors the prepared mind." And perhaps only Ansel Adams could recall (or even know) that the luminance of the full moon is 250 candles per square foot. Almost instantly, he had the shutter speed: 1/250 second. And with this, he calculated the f-stop, first placing the moon on Zone VII of his now-famous Zone System, then placing this value into the exposure formula: the approximate square root of the film's ISO becomes the key stop for Zone VII. Since the film was ISO 64, f/8 would be the stop.
But because overall exposure is not based on Zone VII, but Zone V (the middle gray zone), a proper rendering required two stops more exposure. At f/8, then, the shutter speed dropped to 1/60 second. And there was still more to deal with.
Adams wanted to be sure that everything was in focus, so he stopped the lens down to f/32. That, in turn, called for an equivalent exposure of 1/4 second.
But wait. Adams had put a deep yellow filter on the lens to darken the sky and intensify the yellow highlights from the setting sun. The cost of this filter was a factor of three, so the indicated shutter speed was now 3/4 second. Since there was no such thing, Adams had a choice: 1/2 second or one full second. He chose the latter. (With film, you expose for the shadows; in digital photography just the opposite.)
All of these calculations were made in Adams's head, and all were made instantly.
Having taken the photograph, he wanted to take another "insurance" shot, so he removed the film holder, flipped it, and reinserted it into the camera. As he did so, the sun's light disappeared. There was only one exposure, and the moment was gone forever.
THE PERFORMANCE
Adams expected the negative would give him trouble because of the extreme contrast of the subject. He estimated that the dynamic range of the scene was perhaps a thousand to one; that is, the highlights of the clouds and crosses were a thousand times brighter than the shrubs in the foreground. He knew that his film could record a range of one hundred to one, and the printing paper only fifty to one.
Back in the darkroom, he chose water-bath development, arcane even in those days. First he immersed the film in the developer, then in a tray of plain water. (No stop bath.) While the film sits in water, the developing action is more intense in the shadows and less so in the highlights. After about a minute in the water, the developer is exhausted, so another immersion in it is required to continue development. Adams moved the film back and forth, developer to water and back again, ten times, inspecting the process each time under a weak green safelight. Once he was satisfied with the development of the highlights, he plopped the film into the stop bath, instantly halting the developer's chemistry.
Despite all of this finesse, Adams found the negative flawed when viewed in normal room light. The foreground was severely underexposed, and the band of clouds approached total blackness, or maximum density.
On November 27, 1941, he made his first print of Moonrise. He thought it "acceptable," but was not really happy with it. Nevertheless, he gave that print to Beaumont Newhall, then the head of photography at the Museum of Modern Art in New York. Newhall quite liked it. This first print was formally exhibited in 1944 at the museum's Art in Progress show.

Moonrise, Hernandez, New
Mexico Ansel Adams's First Print
Some four years later (1948), Adams made a print which he considered "final." (It is shown at the top of this post.) And it is this version that survives today.
In reaching the conclusion, he spent more than seven years working with the negative. Yet it confounded him for virtually the rest of his life. It was in 1975 that he finally abandoned Moonrise to the 1948 version. He made more than 1300 prints of the negative, far more than any of his other photographs.
March 2020
Bolsa Chica, Valentine's Day, 2020
A casual friend of mine is a serious birder, and he virtually lives at a place called Bolsa Chica Wetlands Preserve in Huntington Beach, California. In early February, he encouraged me to accompany him to that locale for a day of photography.
"It's mating season," he said. "You won't believe it."
I was skeptical because I had been to Bolsa Chica several times before. And while I could occasionally capture a fascinating bird in a characteristic pose, the whole experience was, for me, rather mundane.
Still, I agreed to go along. And since it was a reproductive time for the birds, we settled on Valentine's Day. Packing up a Fuji X-H1 and a cheap Fujinon 50-230mm lens (75-345mm equivalent), I set off on what would turn out to be one of the most remarkable days of my 75+ years of life. Here are but a few of the more than 600 shots taken that day.


February 2020
The 3 Hardest Photography Challenges I Ever Faced
They were:
1.) The Hummingbird Project
2.) Death Valley
3.) White Sands, New Mexico
The first of these was a self-assignment. The second and third were accidents of travel.
I'll take them one at a time . . .
The Hummingbird Project
Back in 2013, I set up a feeder in the backyard. For the first few days, not a single bird appeared. Then one arrived early one morning. Then another. Then two or three at a time, buzzing and diving at each other for position. (These birds are aggressive.)
The feeder was a hit. And as I watched these tiny creatures, some sort of fascination took hold. I found myself spending more and more time watching their antics. Eventually, of course, I started taking the camera to the backyard. I took a few handheld shots, all quite unsatisfactory.
Clearly, if I was going to capture the fascination I felt when watching these little warriors, some research was necessary.
Investigation revealed that the wings of a hummingbird beat 50-60 times per second.
Okay, I thought, if I use a really fast shutter speed, I can freeze those wings. So I tried 1/800 second, then 1/1600 second. No dice. The wings were still blurry, and my ISO setting was now so high, I was adding some unacceptable digital noise into the equation.
My problem was, I had reliable information about the number of wing beats per minute, but I was missing two other components: wingspan and wing travel.
The bottom line is this: shutter speed means nothing; flash duration means everything. And if you want to completely freeze the wings, more than one flash is required.
But this was not a problem for me. Because I did not, in fact, want to freeze the wings. The tips of the wings, in motion, were exactly what I was looking for.
Next on my to-do list was to contrive a setup that would allow me to comfortably spend an hour or more with the birds, control the movement of the camera and lens with a touch, fire the shutter remotely, and have the camera fire the flash remotely. This was my solution:

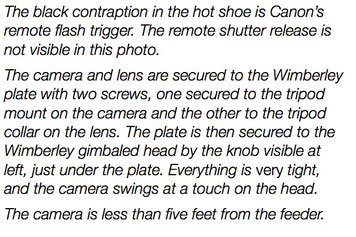
Here are some results from the more than 400 shots taken. . .


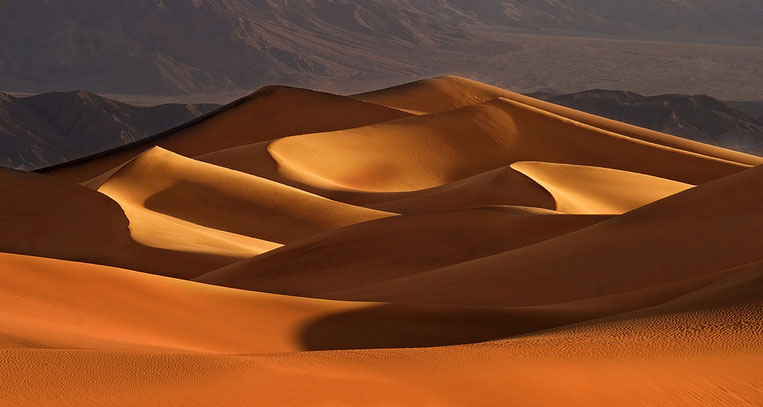
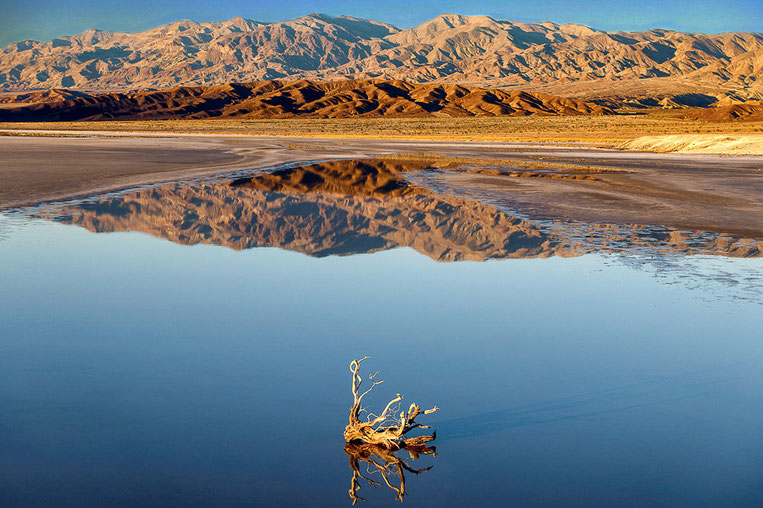
Death Valley
Desert light has always been a significant challenge for me. Intense and unusually hard, it is a light that can confound both photographer and camera. I learned (and re-learned) this on my several trips to Death Valley over the years.
My first visit to this unearthly place was in the summer of 1974. In those days, I was packing Nikon and Hasselblad film cameras with a limited assortment of lenses, a Gossen LunaPro light meter, and some sort of Manfrotto tripod. I am sure that all of this gear made the trek to Death Valley, but I no longer have sufficient records of which gear was used for a particular shot. (The negatives have long since been replaced by scans of varying worthiness.)
I now have only two shots from that initial visit:

My second visit to Death Valley (some 10 years later) was likewise recorded on film. I think at this point, my desert-shooting gear was based on a Rolleiflex TLR and a Mamiya RB67. Two surviving images point to the latter:

My only visit to this region with a digital camera kit was in 2002. Once again, the magnificent dunes and ever-changing light beckoned me for a very early morning visit. In the distance, I sighted an unknown companion who cast a 50-foot shadow:

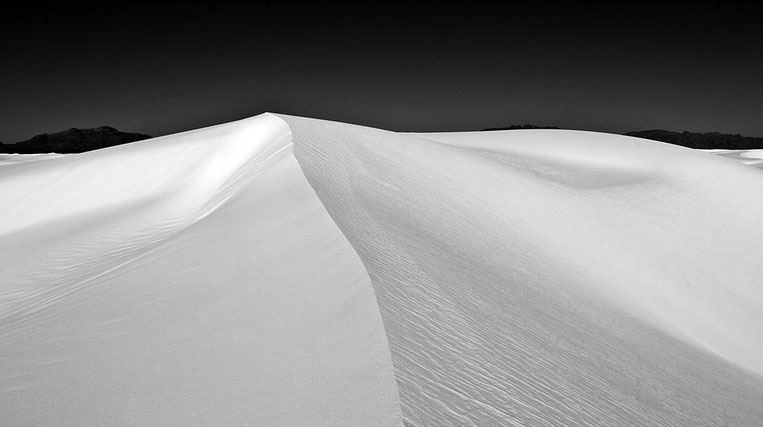
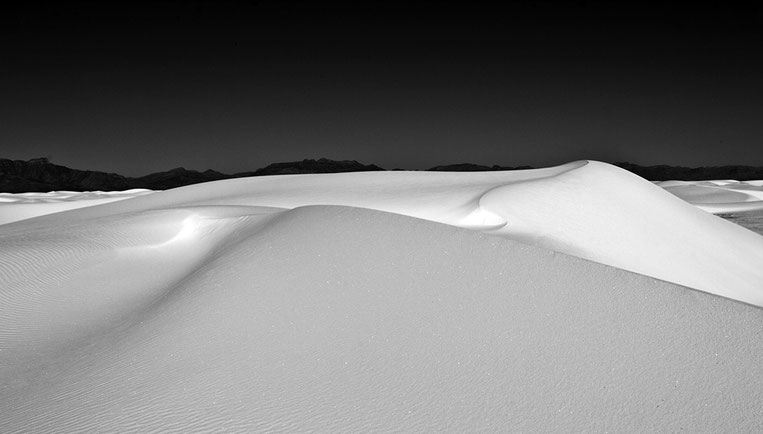
WHITE SANDS, NEW MEXICO
Death Valley is harsh, and the light is unforgiving there. But it is a photographic pussycat compared to White Sands. Here, there is nothing but light and shadow, and both of them are in your face.
I have only visited White Sands once. It was in the early 1970s, and I was on a road trip from California to Florida, where (unfortunately) I was born and grew up. So to speak.
It was late spring, but it felt like August in the New Mexico desert. The sun unrelentingly BEAT DOWN on the sand. Even wearing light hiking boots, the heat from the sand shot up and affected the feet like dipping a toe into too-hot bath water. All in all, a miserable experience made bearable by the sheer extremity of the light.

January 2020
The One-Film-Shot-Per-Day Project, 2019
My personal project in 2019 was to take, minimum, one film shot per day. I intended this to be a visual scream against what strikes me as the general sterility of digital photography.
Sure, I shoot digital as well. But there is a certain warmth to images made on film that I do not believe can yet be duplicated (at least not by me) on a digital sensor.
Unfortunately, I cannot go "full analog," which means that I do not have a darkroom with chemicals, developing tanks, an enlarger, and other print-making gear. So I just have my photo lab develop the film and scan the negatives, and I process the images using digital tools such as Photoshop or Affinity Photo.
HOW THE PROJECT WENT
Over the course of the year, I did manage to take at least one film shot per day. Some days I took two or three or more. On three occasions I shot an entire roll (12 exposures) in one day.
The camera I used almost exclusively was a Hasselblad 501 CM with the magnificent Carl Zeiss 50mm Distagon, 80mm Planar, and
150mm Sonnar lenses, an extension tube for closeups, and either a 6x6 (A12) or 6x4.5 (A16) back.

Rarely (and only toward the end of the year), I used a Fujifilm GW690 III with its fixed Fujinon 90mm lens and a Leica IIIf from 1955
with a 50mm Summarit f/1.5 lens.


All of these machines are, to one extent or another, works of art themselves. They were built to last a lifetime or two, and their
pedigree is apparent by just taking them in hand. It is a privilege for me to be able to hold them, work them, and show them new things. I cannot say the same for any digital
camera.
In all, there were 441 photographs taken. Films used included Ilford FP5
Plus and Delta black and white emulsions (generally ISO 400), Kodak Tri-X and T-Max black and white (also ISO 400), and Kodak Portra and Ektar color emulsions (ISO 160 or 400 and ISO 100,
respectively). Following in the film tradition I learned back in the 1960s, I exposed for the shadows. So ISO 400 films were typically shot at ISO 320, and slower films were shot at respectively
lower ISOs than rated. A fill flash was used, but rarely. This fill light came from an old Canon unit that I picked up at a garage sale for $10.
WHAT WITHSTOOD THE EDIT
Fewer than 60 shots could endure relentless (and heartless) editing.
Here are some survivors -- in no particular order or ranking, except black and white first, color
second.


